Friday, November 19, 2010

Happy Thanksgiving


With my Mother in a nursing home I like to make sure I send her a card for each holiday. Even though I visit twice a week she really enjoys getting mail. Another demonstrator's card inspired this Thanksgiving card, so I thank her. The pumpkins were made using leftover pieces of Designer Series Paper and the extra large and large oval punches.

Saturday, October 16, 2010

Halloween


Here's the Halloween card I made for my Grandson, Jayden. I love the wiggly eyes.

Halloween Cards


I love sending cards to my Grandchildren. I thought I would share the cards I made for them last year using the stamp set "Batty For You" which is available in the
2010-2011 Stampin' Up Catalog. This one was for Carson's 1st Halloween.


It's October already!


My how time flies. I can not believe we are in the middle of October. I guess with the weather being so nice I keep denying the fact that Halloween is only 2 weeks away.
I made this card for a friend. The stamp set is retired from Stampin' Up. To make the moon in the background, What I wanted to show you is how I made the background. I punched a circle out of a post-it and attached it the the whisper white card stock. I then used a sponge and dabbed More Mustard and Pumpkin Pie all over. Once I had it the way I wanted, I removed the circle and stamped the haunted house with basic black on top.

Saturday, September 11, 2010

Inspired By Nature


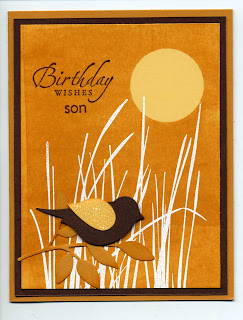
I saw this card done by another SU demonstrator and had to try it. Create a mask for the sun by punching out a 1" circle using a post-it note. The glue on the post-it will hold the circle in place while you brayer ink over the card stock. The
background card stock is Daffodil Delight and I used More Mustard ink to brayer over it. Remove the circle mask and stamp the grass using VersaMark and add white embossing powder to finish the grass. I added the 2 step x-lg punch for the bird and the sizzlet leaf die. Stamp your greeting in Chocolate Chip and you card is complete.
My son loved his birthday card.

Lovely as a Tree

I friend of mine gave me this stamp set a couple
of months ago. I was so excited to get it.
I created the background by taking a piece of

card stock and using my coluzzle oblong template I cut out the center. It them becomes a mask for the from of the card. I took a sponge and lightly dabbed some color along the edges moving towards the center. Leaving the template still in place I inked the tree stamp and "stamped off " on a scrap piece of paper to remove some of the ink and then stamped part of the tree inside the template. I repeated this step 2 more times. I removed the template and with a Chocolate Chip and Garden Green Stampin' Write markers I added color to the stamp, and stamped the full tree over the other tree images. Add your greeting and some ribbon and the card is complete. A simple but elegant card.

Hope you like it.

Monday, August 16, 2010

Pocket Silhouettes

Here is a simple card made with the stamp set
Pocket Silhouettes. I love the color combination of Daffodil Delight, Basic Black and White White. Add Basic Gray and you have the colors of my bedroom redo next month.

PS: Thanks Mary for inspiring this card.

Thursday, July 22, 2010

2-Step extra large Owl Punch

I found these cute wiggly eyes at my local
craft store a few weeks ago and knew I
had to get them to use with this new punch.
I love the eyelashes! The leaves are from
the 2-step extra large Bird punch.

Hope you like it.

Saturday, July 17, 2010

Sweet Scoops

This is a great birthday card for this time of the
year. The stamp set is Sweet Scoops offered
in the Summer Mini catalog available through
August 31st. The verse that is included in this
set is "Have a sweet celebration!".

Hope you are enjoying your summer.

Monday, June 28, 2010

Pocket Card

Sometimes you need to change the style of card you are making. To make a pocket card you do the following:

1. Cut a piece of card stock lengthwise at 4 1/4". You still get 2 cards from an 8 1/2 x 11 piece of card stock.
2. Score the card stock at 5 1/2" and 1 1/4".
3. Fold at your score marks having the flap on the outside.
4. Apply sticky tape to the inside edges of the front of the card up to the crease of the flap.
5. Add your decorations to the front of the card. I used Designer Series Paper, corduroy button, and punches on mine.
6. For the inside part of the card, cut a piece of card stock 3 1/4" x 5". Add decoration and greeting.

The pocket card can also be used for holding a gift card.

First Day

Here's another idea for a 6 x 6 scrapbook page using the stamp set First Day. This page was inspired by another demonstrator's greeting card. I love the wiggle eyes on the worm.

Card stock used was Bashful Blue, Whisper White, Real Red and Wild Wasabi.

Sunday, June 20, 2010

Elements Of Style

Another new stamp set in the Summer Mini is Elements of Style and a new product called Smooch Spritz (both will also be available in the new 2010 - 2011 Idea Book and Catalog in July). Once I stamped the floral and colored the flowers I used Log Cabin Smooch to add a splash of aging to the card.
Hope you like it.

School Days


Here's another 6 x 6 Scrapbook page for starting school. This one I only used Contempo Alphabet and punches to create this page.

First Day

One of the stamp sets in the Summer Mini is called First Day. It is available in both clear and wood mounts. My Grandson, Jayden is starting Kindergarten this fall so I decided to use this set to create a 6 x 6 scrapbook just for his school days. I can't wait to take pictures of his first day of school!

Baroque Motifs

I love when I can put a card together quickly. I used
Baroque Motifs to make this Thinking of You card.
I used Basic Black Real Red and Craft Card Stock.
Also, in the new 2010 - 2011 Idea Book and Catalog
Kraft card stock will be called Crumb Cake. It has it's own
stamp pad and Stampin' Writer Marker. I love using
Kraft card stock so I am so excited about the new products.

Saturday, May 8, 2010

Wedding Card


I found this wedding card on our demonstrator's web site and thought I would share it with you. Card stock, punches and a little basic black grosgrain ribbon and you have a cute wedding card.

Sunday, April 25, 2010

All My Love


It's been a while since I posted anything and I apologize for that. My Mother had a stroke just before Christmas and it has been a long road these past few months. Being the only one to care for her needs it has absorbed most of my free time. She is now somewhat settled in a nursing home where she can be cared for. It was a sad day when I had to tell her that she would not go home to her apartment. With the help of my family and my good friend Barb we cleared out her apartment in March. I still have a lot to do but decided it was time to get back to my stamping if for no other reason then it is good therapy.
Thank you for your patience.
Pat

Thursday, February 25, 2010

Scrapbooking your best friend

Love this photo of my Grandson, Jayden and his dog, Angel. It was a great opportunity to scrapbook the moment. I used the In Colors stamp pads, card stock and Vintage Vogue stamp set. This is such a versatile stamp set. If you want to start scrapbooking and afraid that it might be too complicated, try starting with 6 x 6 scrapbook.

Vintage Vogue

This card is a combination of the Stamp sets Teeny Tiny Wishes, Vintage Vogue, Very Vintage jumbo wheel, SU's Sizzix BigZ Beautiful Butterflies,textured plate Flourish, Oval Punches and Photo Corners Punch. I also used Old Olive stamp pad and Old Olive and Whisper White Card Stock.

Hope you like it!

Thursday, February 18, 2010

Happy Birthday


Okay, I guess I really like the new Extra large 2 step Bird Punch so here is one more card using it and the new Pinking Hearts Border punch from the Occasions Mini Catalog.

Saturday, February 6, 2010

Christmas 2009


This is the last page from our January scrapbook class. This page used the Sizzix Big Shot die, embossing, Designer Series Paper and the Ornament punch that were offered in the Holiday Mini.

As always, I love to see how the group adds their own touch to each page. I think next month I will take photos of the groups finished pages and post them for you to enjoy (If they will let me).

Barb and Nancy, we missed you at the January class!

Cheap Talk

Another page from our January Scrapbook
Class. We used Cheap Talk stamp set,
sizzix die, Designer Series Paper and
a few punches to create this cute
layout. Got to say, my Grandson is soooo cute!!!

Ready for Snow


We had a lot of fun at our January Scrapbook class. As always my favorite subjects are my Grandsons. A simple page using sizzix dies and Designer Series Paper.

Friday, February 5, 2010

New Extra large 2 step Bird Punch

Sorry it has been a month since my last update. Things have been a bit crazy around here. My Mother had a mini stroke the week before Christmas and I have had to take care of a lot of stuff. She is in a nursing home right now for rehab and hopefully, God willing she will get better.


With that said, I am so excited about the new punch style offered by Stampin' Up in the new Occasions Mini. The Extra Large 2 Step Bird Punch is so much fun to use. Below, are two similar cards using different stamp pads and Designer Series Paper. Easy cards to make in a less than 2o minutes.


Friday, January 8, 2010

Vintage Vogue

Stampin' Up launched thier new mini catalog on Jan. 5th with a new design of punches and clear mount stamps. You can purchase the stamp sets in either wood or clear mount. I purchased the clear mount Vintage Vogue set to try the clear mount. I was pleasantly surprised how much I liked them. Stampin' Up still uses their quality rubber on the clear mount. Each set is stored in a sleek plastic case.